About Comments

Comments are enabled on all postings. Click a posting to find the comment box. Comments are moderated and appear after my review.

Friday, 6 August 2010

Another Go at ACE Coach Roof Boards

The objective is to create ACE coach roof destination boards that are portable, thus enabling the boards to be removed so that the coaches can be re-deployed for other train formations. My previous method looked good but with a small sticky area had the tendency to peel with changes in ambient temperature. I also think the stickiness would wear away with use. 

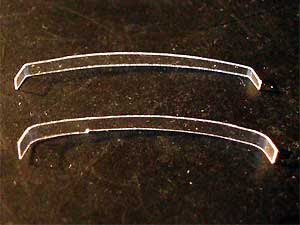
My latest method uses roof saddles to hold the boards in place without the need for adhesive. The boards are made as previously described except the label covers the entire backing plastic. We need transparent saddles to disguise their presence. Take a 1 litre 'High Juice' drink plastic bottle - mine came from Lydl. The curvature is almost the same as the Backmann 00 Bulleid coach roof. Slice through the bottle to extract a ring. Cut from the ring two strips 34mm long and a few mm wide. Using pliers bend the ends to an angle of about 60 degrees and about 3mm long. These are tabs to which the roof board is glued. This plastic takes bends very well.

Place masking tape across the roof width alongside the boards end brackets. (This is to protect the roof from the glueing process). Place the saddles and hold down with more masking tape. Offer up and hold a roof board against the bent tabs and carefully wipe some liquid plastic glue with a brush into the joins. Repeat for the other side. When set, gently remove the masking tape from the saddles and lift off the assembly. Remove the tape from the coach roof. 

The assembly fits snuggly on the roof with the angle of the board looking correct. The whole assembly is quick to apply and remove indefinitely. The plastic saddles are glossy which tends to reflect light giving their presence away. Might be an idea to paint them the same colour as the roof.



Wednesday, 4 August 2010

Peter Denny Video

Fans of the famous railway modeller Peter Denny will know that he passed away in December 2009 aged 92. He was a great inspiration for my own modelling activity. I followed his articles in 'Railway Modeller' magazine and bought his 1972 book 'Buckingham Great Central'. 

Thursday, 15 July 2010

Invalid Car 4mm Scale Model - Part 4

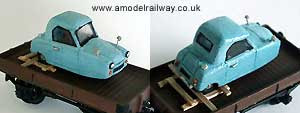
Paul Bartlett's photo (ref. part 3) posed a dilemma for me. It shows a pre-1963 car with side mounted indicator lights. Cars from at least 1964 onwards had the indicators integrated into a cluster with the brake lights on the rear. Which should I model since I don't know the year they changed the design? The location of Paul's photo is unknown, may not even be the Southern. I opted for the later period since I have photos of the cars ready for dispatch at Broad Clyst in 1964. Unfortunately, the 1962 photo of the train conveying the car is too distant to show its details. (ref.part 1). So, here is the finished item, all trussed up ready for transportation. 

Fittings: 
  • Headlights: Bodged fence post from an old Airfix kit.
  • Front indicators: 0.6mm wire 
  • Door handles: 0.6mm wire 
  • Rear light cluster: material as headlights. 
  • Petrol cap: mushroom vent from a coach kit 
  • Number plates: black paper - too small to add registration details 
  • Wing mirrors: dressmaking pins with a bulbous end that is filed flat(ish
  • Exhaust Silencer: cocktail stick 
 The window glass was particularly tricky to cut and fit. I declined to fabricate the single windscreen wiper, which would have to be a hair at this scale! 

Related Posts Plugin for WordPress, Blogger...