About Comments

Comments are enabled on all postings. Click a posting to find the comment box. Comments are moderated and appear after my review.

Thursday 15 February 2024

SLA Resin 3D Printer #1


I have used an FDM (fused deposition modelling) printer for many years. My decision to invest in Resin Printing is to achieve finer model details compared to FDM. FDM has its place where detail is less important.

SLA (stereolithography) Resin printing is a whole different ball game. About the only common attribute is they both create models by layering the material.

Compared to FDM my research revealed:

      1. PPE required (the resin is toxic)
      2. Tall models take much longer to form. (all day, or more in worst cases)
      3. Resin requires an operating temperature 25-30 degrees C.
      4. Post processing necessary requiring extra equipment
There may be more. This is the price to pay for injection moulded quality of models without the high engineering costs.

Having studied tutorials and reviews I settled on the Creality Halot Mage. Its build area is what I need, the reviews were favourable and it is very good value for money. I bought it discounted by Creality and discounted even further using the their discount code. Another influencing factor was shipping from a UK supplier. (As far as I know all resin printers are made in China).

I am not going to review the machine as there are plenty of reviews on YouTube. Suffice to say the quality of build appears high and the user interface simple to understand and quick to navigate. Instead I'll say a few words about my buying experience.

Their UK online shop has the appearance of a UK company. It is well written in English language, easy to navigate and the buying process straightforward and delivery progress reports adequate. I assumed the sales operation was within the UK. Something jarred me though, can't remember what. 

After making the purchase I decided to check out reviews of the company and I am afraid there were some horror stories reported on Trust Pilot and elsewhere. It transpires that the sales and after sales operation is run from China and not the UK. Some people did not receive equipment, the equipment was incomplete or damaged, could not get refunds, damaged goods had to be returned directly to China. I became quite worried. Had I chosen a good supplier? 

One business day after purchase I received an email stating that my order was being shipped by Fedex on behalf of Ascent Transport Ltd. who the hell was that! Is this a scammer email? I researched the company and discovered it was a Chinese owned distribution centre located in Liverpool. Next day I received an email from Fedex stating delivery that morning. And it duly arrived two business days after purchase. Phew!

The machine was well packed and initial set up tested OK. I have yet to print because I need to buy more materials and equipment.

Purchased so far:
  1. Nitrile Gloves
  2. Washing tank
  3. Cotton wipes
  4. Resin
  5. Silicone Mat
  6. Funnel
To Buy:
  1. Heater
  2. Temperature Controller
  3. Temperature Measuring Gun
  4. UV curing Chamber
My only concern now, having read supplier reviews is, if it breaks down can it be repaired?


Thursday 8 February 2024

In The Beginning

Photography IMHO is the greatest media invention of all time. Not so much for technological innovation but more of its ability to show long past scenes today. When this relates to ones own past it is even more amazing, especially when that scene or event is mostly lost from memory.

This was the case when recently I discovered two very old photographic negatives among my possessions that depict a model railway/ train set that I must have once owned. The negatives measure 1 and 3/4 inches square. I don't know what size of film this is or what camera was used. The quality of the snap shots are poor, looking over exposed with little detail visible. 

My scanner has a facility to scan negatives, well 35mm negatives to be precise which is a little smaller than the old negatives. Never the less I was able to fit the negatives in the scanners film holder. The scanned output produce very dark images but by using a photo editing application I was able to enhance them to some degree to reveal details not obvious from looking at the negatives. I recognised objects in the scenes as being mine but the model railway itself was a mystery. The snap shots  must date back to either the late 1950s, when my father set up a train set for me on permanent boards in the bay window of their ground floor flat or, late 1960s when I built my first model railway on a 6 x 3 foot board.

This first scene shows a tunnel mouth embedded in landscape and a train disappearing into it. I can see that the trackwork is the original Triang Railways standard grey track from the 1950s - the rails are embedded in a cambered, grey substrate depicting ballast.

The rolling stock in the tunnel is probably the last coach of the train and this would have been a Triang Railways maroon suburban brake coach from the same period. The track was lost during a house move in the 1990s and the rolling stock sold some time later. I don't know what the building is on top of the tunnel mouth. Whilst I tend to keep (or sell) my past accessories I don't recall this building.


Another scene from the same layout. There is more going on here. In the centre we see what appears to be a timber yard with a group of large tree trunks awaiting processing. On the right is a Lesney Matchbox Rotinoff Super Atlantic Tractor and Trailer Nos 15 & 16 dating from the late 50s (since sold). On the left is a tractor. Now I remember having doubts as to it being a Lesney product as there were no identifying marks on it. It shows rubber tyres that replaced worn out caterpillar tracks. This change might place the layout as the 1960s version. I don't remember where the tractor is now. The fences in this scene I still have.

At the bottom is an Airfix detached house and at the top an Airfix public house (both since sold).


Friday 2 February 2024

A Landy for Corona Quay


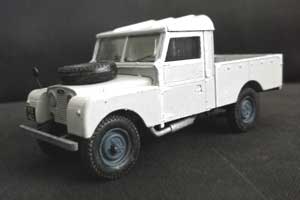
This is the Airfix 1:43 scale Land Rover Series 1 kit released 4th quarter of 2023. The Series 1 was manufactured by Land Rover from 1948 to 1958 so, I thought it would be a nice addition to my Corona Quay layout, set in the early 1960s.

I did not intend this to be a kit review but there were some issues that you may wish to consider if wanting one. Never the less it is an easily assembled kit delivering a fine looking model.

This Airfix kit, whilst highly detailed in parts, has some notable exceptions. Being a 'Starter' kit for novice constructors this may be excusable but there is one glaring omission that is highly visible on the prototype. More on that latter.

The components are weakly mounted on the sprues and can be easily knocked off and lost. This happened to me as after washing in soapy water, as instructed, I noticed one component was missing from the sprue. The front axle is a two part assembly, I only had the lower part that does not have the axle stubs for fitting wheels. I can only assume the missing part containing the axle stubs was sent down the sink plug hole! I remade the missing part from a wooden cocktail stick.

I used the paints from the kit. The body colour provided looked white to my eye. It should be light grey so, I added a small amount of black to the pot. By the way, red for the rear lights is not provided.

About the kit omissions, I'll start with the cabin.

The three gear levers are not included in the kit and the footwell moulding has no foot pedals. The later, if it was provided, cannot be seen after assembly so its absence is of trivial concern, except for the purist modeller of course! I decided not to fabricate pedals.

The gear levers I did make but, even these are not noticeable unless the cabin is lit with LED or sun. All levers are made from 0.5 mm diameter wire. The knob on the longest lever was fettled from kit sprue and the two smaller ones were made from a drop of superglue on the wire end and then dipped into bicarbonate of soda to solidify and bulk up. (Note: The 'yellow' lever was a later addition to Land Rover's range).

Next is the exhaust pipe.
This really should be part of the kit as it is highly visible on the prototype. There are a couple of holes in the chassis frame that look as though they are for a pipe to feed through since they serve no purpose in the standard kit. If they are for an exhaust pipe then one is in the wrong place because the pipe bends to the side of the landy in photos I have seen and not out the rear. That hole can be seen in the photo.

I made the pipe from sleeved solid wire with the wire pulled back a bit to reveal the open end of the sleeve. The two silencer boxes were provided by slipping over a sleeve taken from thicker wire.

Finally the wing mirror.

A brochure from the period shows a single wing mirror on the drivers side. It may be that not all landys of the period had wing mirror(s). The prototype in the photo on the Airfix box does not have one.

But, since I was having fun making the previous missing parts I decided to continue to make a wing mirror, fabricated from wire and kit sprue. The mirror itself being silver paint.




Related Posts Plugin for WordPress, Blogger...