About Comments

Comments are enabled on all postings. Click a posting to find the comment box. Comments are moderated and appear after my review.

Thursday, 28 March 2024

Ballast Cleaning Train - Part 16 (SLA Resin 3d Print Version)

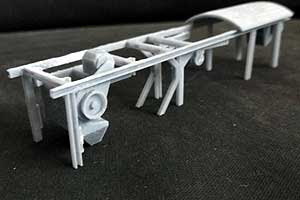
There is a lot that could go wrong with the design and print of this generator wagon chassis. For a start there is a lot of thin levers, rods and brackets in the underframe that may not print well. Then, there is the distance between axle boxes; did I get it right taking into account fitting of brass axle bearings and free running wheels.

Well, the print (6hrs 42 mins) was near perfect. The only damage was a few breakages as I cut away the intense support structure. (I think the Lychee auto support facility goes OTT on quantity but, it is a godsend for the novice.) Plasticard infills repaired the breakages.

One mistake was to use a hairdryer to quickly dry off the print after water washing. The heat warped the axle box tie bars badly. The print is quite pliable prior to UV curing so, I used various materials with required thicknesses to prop and force the tie bars as straight as possible before the UV curing process. The UV then hardens the plastic allowing parts to hold their shape. The tie bars were much improved although a little warping is still present that I'll have to live with. I really don't want to reprint the model.

The wheel sets fitted perfectly between the axle boxes. However, they did not turn freely. I had made a big design mistake by setting the brake shoes too close to the wheel treads and flanges. The brakes were locked on! I had to snip off the break shoes, cut the brake rods back a little and re-glue the shoes in place. Did I say I really don't want to reprint the model. (It uses a lot of resin and takes too long.)

Talk about printed detail - the individual leaves of the leaf springs are clearly visible! Each leaf must be no more than a quarter millimeter thick.

Postscript: I had a eureka moment about the warped tie bar. I glued a piece of stiff wire behind the tie bar which pulled the bar straight.

Tuesday, 26 March 2024

Ballast Cleaning Train - Part 15 (SLA Resin 3d Print Version)

 Printer worked flawlessly this time.

Here are the cabins for the ballast cleaning machine and generator wagon plus two more components (print time 7hrs 42mins). Once again some fine details visible.

The cabin on the left has two hand rails replaced with copper wire because I knocked the printed ones off whilst removing supports. The auto support generator facility of the Lychee Slicer Application was a bit over ambitious there stuffing the rails with unnecessary supports that were hidden by other supports  (and on the printed model). I could not see them in the Application to manually adjust but, have since found out how and have adjusted the offending ones.

I believe there is just one more model to print and that is the generator wagon chassis.


Monday, 25 March 2024

Ballast Cleaning Train - Part 14 (SLA Resin 3d Print Version)

Change of plan. 

I like to be around during the print to keep a check on things - and it is a good job I did (more on that later). It is a case of knowing when I am available against time needed for a print run so, the cabin mentioned previously is deferred in favour of others.

First up are the conveyors (print time 6hr 50mins). Two needed a reprint due to inadequate support structure and even after further optimisation the third one down in the photo has a deformed end. Fortunately this will be hidden when assembled so no problem. Removing the support structure is fraught with difficulty as it is easy to break elements of the model. In this case plasticard implants saved the day (e.g. the white part on the right hand end of the nearest conveyor).

On checking the print progress I was alarmed to see the print had paused and an error message on the screen saying the USB stick was disconnected. It seems for each print layer the program reads the file on the USB stick memory rather than importing the file to internal memory for processing. The error message included an instruction to reinsert the USB stick. Having done this the print resumed exactly where it left off without any damage to the finished model. That is impressive! However the same problem arose 4 or 5 times early in the printing cycle before it settled down.

This event has been reported by others. I have not found the cause but it could be due to one of three reasons, programming fault, dodgy contacts or unstable USB stick. I changed the USB stick and the next print run was faultless. But, my confidence was a little shaken and now feel I must monitor print runs periodically.

The next print was the girder frame (print time 9hr 42 mins). This model is extremely delicate and needed a mass of supports, many in awkward places making them difficult to remove. Great care is needed. 

I am pleased to say there were no deformations!

I was really impressed with the quality of this model, especially due to its complexity.

The hand rails (photo below) prove that this technology is ideal to achieve fine details. They are only 0.5mm diameter with a 0.5mm gap to the girder.


To Part 15.
Related Posts Plugin for WordPress, Blogger...