About Comments

Comments are enabled on all postings. Click a posting to find the comment box. Comments are moderated and appear after my review.

Tuesday, 26 March 2024

Ballast Cleaning Train - Part 15 (SLA Resin 3d Print Version)

 Printer worked flawlessly this time.

Here are the cabins for the ballast cleaning machine and generator wagon plus two more components (print time 7hrs 42mins). Once again some fine details visible.

The cabin on the left has two hand rails replaced with copper wire because I knocked the printed ones off whilst removing supports. The auto support generator facility of the Lychee Slicer Application was a bit over ambitious there stuffing the rails with unnecessary supports that were hidden by other supports  (and on the printed model). I could not see them in the Application to manually adjust but, have since found out how and have adjusted the offending ones.

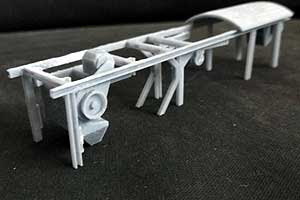
I believe there is just one more model to print and that is the generator wagon chassis.


Monday, 25 March 2024

Ballast Cleaning Train - Part 14 (SLA Resin 3d Print Version)

Change of plan. 

I like to be around during the print to keep a check on things - and it is a good job I did (more on that later). It is a case of knowing when I am available against time needed for a print run so, the cabin mentioned previously is deferred in favour of others.

First up are the conveyors (print time 6hr 50mins). Two needed a reprint due to inadequate support structure and even after further optimisation the third one down in the photo has a deformed end. Fortunately this will be hidden when assembled so no problem. Removing the support structure is fraught with difficulty as it is easy to break elements of the model. In this case plasticard implants saved the day (e.g. the white part on the right hand end of the nearest conveyor).

On checking the print progress I was alarmed to see the print had paused and an error message on the screen saying the USB stick was disconnected. It seems for each print layer the program reads the file on the USB stick memory rather than importing the file to internal memory for processing. The error message included an instruction to reinsert the USB stick. Having done this the print resumed exactly where it left off without any damage to the finished model. That is impressive! However the same problem arose 4 or 5 times early in the printing cycle before it settled down.

This event has been reported by others. I have not found the cause but it could be due to one of three reasons, programming fault, dodgy contacts or unstable USB stick. I changed the USB stick and the next print run was faultless. But, my confidence was a little shaken and now feel I must monitor print runs periodically.

The next print was the girder frame (print time 9hr 42 mins). This model is extremely delicate and needed a mass of supports, many in awkward places making them difficult to remove. Great care is needed. 

I am pleased to say there were no deformations!

I was really impressed with the quality of this model, especially due to its complexity.

The hand rails (photo below) prove that this technology is ideal to achieve fine details. They are only 0.5mm diameter with a 0.5mm gap to the girder.


To Part 15.

Wednesday, 20 March 2024

Ballast Cleaning Train - Part 13 (SLA Resin 3d Print Version)

I was not totally satisfied with my FDM 3D printed ballast cleaning wagon models, due to lack of detail, plastic layers evident and design errors. This lead me to buying an SLA 3D printer, which gives injection moulded quality without the high development cost.

This series of posting is as much about my experience as a novice in this technology as the development of the model.

I started with the ballast cleaning machine to be followed later by the generator wagon. Potentially the model could be printed as one piece instead of the 60 odd parts made on the FDM printer. However, I am aware that invariable it is not until the SLA printer has done its work that we can review the finished model for flaws and since the process takes many hours then a serious flaw in the model results in wasted time and materials. In view of this I split the model into about 20 parts. (I do know that tools are available to assess the model for flaws before it is printed)

For efficiency the build plate of the SLA printer should be filled with parts as the printing time is dictated by model height rather than number of models on the build plate. As a novice I expected failures so, to avoid waste I limited the number of parts.

First, I produced a small batch of odd ball parts. Their .stl files were loaded into Lychee slicer software and the automatic support feature activated to create the essential support structure. The output file was loaded into the printer and print started. 3.5 hours later the prints were ready and yes, one of the parts failed. The first oil drum in the photo has a split and is deformed. This was solely down to inadequate supporting structure. This one's support structure was different to the others. I simply copied that of a good model and printed again satisfactorily.


1st attempt with support structure
Next was a more complex model - the ballast cleaning machine chassis. After 5.5hrs the chassis was ready. Yes, there were flaws. They did not look too damaging but as there were quite a few deformations and I accidently broke off some of the steps I decided to strengthen the steps in the design, review the support structure and print again. Quickly I learnt that the support structure is critical and the automatic support generating feature of Lychee is not a panacea for success. The deformations helped me in understanding where more supports are needed and these were manually added. 


2nd attempt

After washing uncured surface resin away the support structure is severed from the model using snips. Great care is needed in doing this because delicate elements are easily damaged - and this did occur. Thankfully a spot of Superglue worked well to stick back damaged parts.

There were still some very minor deformations that I can live with, except one place being more noticeable. I did not want to print again so I filled the gap with a piece of plasticard filed to fit. I also accidently knocked off the edge of the buffer bean (This stuff is very brittle) which was corrected with more plasticard.

I am very pleased with the quality of finish. Surfaces are smooth, very small parts well formed and rivets that I added to the buffer beam in the design are visible.

Next to prepare and print is the cabin.

To Part 14.

Read about the SLA resin 3D printer here.

Read about the FDM model here.


Related Posts Plugin for WordPress, Blogger...