About Comments

Comments are enabled on all postings. Click a posting to find the comment box. Comments are moderated and appear after my review.

Sunday, 16 January 2022

Corgi 417 Revisited

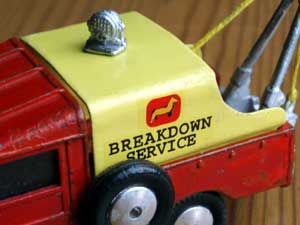
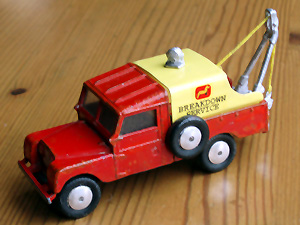
Back in March 2019 I posted my efforts in restoration of my Corgi 417 breakdown truck. What was not included was a replacement for the missing canopy as I did not find one in the market at the time. Now, nearly 3 years later, I wondered if I had some metal to fabricate one. A root through my box of bits revealed, surprisingly to me, a small piece of tin that was just about the right size. No idea where that originally came from.

The dimensions and placement of the canopy rear curves and roof searchlight position were determined by observation and scaling a photograph on ebay of an original truck. Much fiddling ensued to fold up the metal accurately.

Paint was sprayed using Revell enamel paint no.12 with a little white No. 4 mixed in to mimic the original shade, as best I could.

I searched ebay for searchlight and decals. These were found from this buyer, who also sells a replacement canopy!

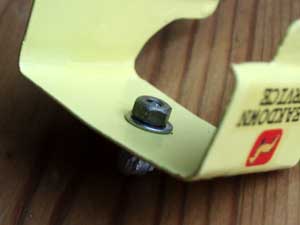
The searchlight has a spigot that pokes through the fixing hole but no clamp supplied to hold it in place. I used a nut and reduced the diameter of the spigot with a file until I could screw the nut on, making its own thread in the soft white metal. Enough slack was left so the searchlight can swivel.


The truck red paintwork was quite badly chipped. Since it now has a new, pristene canopy I decided to touch up the chips with red paint. Not perfect but looks better than before


Tuesday, 21 December 2021

DIY Refurbishment of Zero 1 Keypad

The Hornby Zero 1 is the simplest and cheapest DCC system to operate, albeit with limited functionality. Second hand controllers and chips are available from ebay. The biggest downside is the loco chip board that is too big to fit into some modern tank locomotives and it does require some ingenuity to fit into some larger modern locos.

The system was launched by Hornby in the 1980s and after 40 odd years it is no surprise that the keypad fails. It is the weakest part of the controller design. The failure is due to the carbon tips of the elastomer keypad keys wearing away. Happily it is easily fixed without the need for electronics knowledge or great expense.

Sorry, no pictures.

  1. Remove from power source
  2. Drill out the 10 rivets holding the unit top to base
  3. Lift off the top starting at the rear, rotating to the front taking care not to damage wires between base and top
  4. Remove the small phillips screws that hold the keyboard in place
  5. Gently easy back the two keypad front retaining clips to release the keyboard and fold away to reveal the elastomer keypad
  6. If the button circuit areas on the printed circuit board look dirty then clean with Isopropyl Alcohol and if still dirty use a fibreglass rubber or scalpel taking care not to destroy the circuit tracks
  7. Brush away any detritus on the black pads of the elastomer keypad with a dry paintbush.
  8. Take some aluminium kitchen foil and a paper hole punch that has a 5mm punch and punch out 17 circles. If the punch is larger than 5mm then cut squares instead that are a little larger than the black pads of the elastomer keypad
  9. Test fit an aluminuim pad over a black pad to ensure it is wholly contained within the well and below the top surface
  10. Glue the aluminium pad on top of the carbon pad with a small drop of super glue and check it has set, i.e. does not slide off the pad
  11. Press lightly on the fixed aluminium so that it slightly wraps down the side of the carbon pad
  12. Repeat for all buttons
  13. Refit the keyboard and top to base. The top should be located at the front first and then rotated over the rear
  14. Since the unit was held together with rivets it is not be possible to fix the top to base easily. You might try a couple of small wood screws screwed into the palstic holes.


Friday, 8 October 2021

Presflo Cement Wagons - 4mm scale

This is a lesson on the benefits of never throwing away spares or scrap.

I decided to tidy up the railway room and the first drawer I opened contained about six broken wagons including the Airfix Presflo Cement Wagon. The task of tidying up the room quickly evaporated as I thought to myself - maybe I can repair this wagon.

It is a lovely model because of its detail and unusual style. Unfortunately the roof, couplings, buffer heads, one step, vacuum pipes and decals were missing. Whilst the chassis was (untidily) painted gloss black the yellow body of the virgin kit was retained. This model must be over 60 years old and probably built by my late father. I noticed that the body had been assembled back to front relative to the chassis. I knew this because more recently I bought another kit, rebadged Dapol, and assembled it correctly to instructions and prototype.

Having a 3D printer to hand it did not take long to design and print a new roof using the Dapol model as a style guide, except the very small roof hatch cover latches and hinges had to be cut and fitted from scrap plastic since it was beyond the capability of my printers resolution, being the filament laying type.

Buffer heads were fashioned from nails having the right size heads and fitted into holes drilled in the buffer shanks.

Vacuum pipes came from other wagon left overs and the step was fashioned from plastic scrap.

Couplings were purchased.

What to do about the reversed body? Carefully break away the ladder and vacuum cylinders and swap their positions. There is still a bit of detail molded in (barely noticeable) that are at the wrong ends.

Airfix Blue Circle Presflo
Whilst researching the prototype I came across a modeler who had fabricated and fitted the pipework that is missing from the model design. I did the same and it really adds to the character of the model.

My research revealed that the Yellow paint scheme of the Blue Circle 1950s wagon was short lived, being repainted grey because the yellow was quickly stained by cement powder spills. I opted for the grey. I know the grey was prevalent in the late 1960s and into the 1970s. I do not know the years it was introduced and later scrapped.

Halfords grey primer was applied all over and the chassis and wheels hand painted Humbrol satin black. Light weathering was applied using white and brown pastel scrapes and then sprayed with 'firm hold' hair spray. 

Dapol BR Presflo
When I made the Dapol kit I decided to finish it in BR bauxite with BR decals, which meant I did not need the Blue Circle decals that came with the kit. These were retained and now applied to the Airfix kit.

This photo below is of a train comprising a presflo cement wagon. The makeup of the train with its West Country Bulleid engine replicates that shown in a John Day photograph of the prototype train from 1962. Note the Invalid Car on the second wagon.

Related Posts Plugin for WordPress, Blogger...