About Comments

Comments are enabled on all postings. Click a posting to find the comment box. Comments are moderated and appear after my review.

Monday 31 May 2010

Bulleid Restaurant/Buffet Build - Part 6 (It's Not a Perfect World)


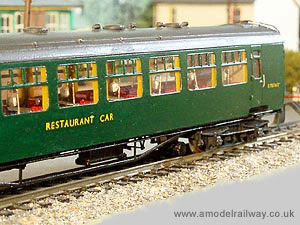
The same method of hand painting as described in Part 3 was used for the green sides but the paint is 'Phoenix Precision' instead of 'Humbrol' that was used on the roof. The former seems to dry more quickly making it less easy to work so, I have ended up with a slightly more uneven finish than the roof. Lettering is 'Pressfix'. The numbers in particular are minuscule and each is applied individually with the aid of a scalpel and magnifying glass. A coat of matt varnish protects lettering from being rubbed away with handling.

Comparison with the prototype reveals some inaccuracies. For example, the grab handles should be shaped ']' and the body sides should hide more of the solebars. There is also a raft of other very small details such as brackets and panel joins on the prototype that have not been modelled. How far do you go with these fine details? I'm pragmatic about this. My aim is to create an impression of the period I'm modelling rather than to count every rivet.

These have been the most complex and time consuming kits that I have built. Turning flat metal into a 3-dimensional model by hand is nothing short of remarkable, even if I say so myself. The objective for me however, was not to build a kit but to create a representative 'Atlantic Coast Express' train. So far I have the Bulleid Merchant Navy locomotive, the first three coaches comprising the Ilfracombe set and now the restaurant buffet set. I need another 4 (Backmann) coaches to complete the ACE in its shortest form as it travelled west through Crewkerne in the early 1960s.

Friday 28 May 2010

Bulleid Restaurant/Buffet Build - Part 5 (Fishing Tales)

18 tables, 18 table lamps and 54 chairs. That's what needed to be formed, assembled and painted to populate the restaurant coach. Whilst tables and chairs were in the 'Comet Models' kit, the lamps were not. The only examples I found from the trade were not representative so, I had to find some way of making them from scratch, especially the lamp shade. 

After much head scratching I stumbled upon a box of fishing line lead weights amongst my stock of modelling oddments. These are a few millimetres diameter with a slit into which the fishing line is placed. The lead is then pinched to hold fast to the line. The unkind close up photo. is of a table and lamp that is only about 15mm tall overall. You can see the lamp stand is brass wire. The lead weight (painted white) is attached as described above with a drop of superglue to stop it slipping off. The good thing about this approach is the lead can be pressed into various lamp shade shapes by pinching with a pair of pliers.


Wednesday 26 May 2010

Bulleid Restaurant/Buffet Build - Part 4 (Doll's house modelling)

Do not know for sure whether this colour scheme is valid- brown wood panelling, white laminate counter and tables with red chairs. The MRC magazine for November 1980 has very detailed plans of the interior, down to location of the refrigerator for example, but no interior colour scheme is defined. 

Building the interior felt like fitting out a doll's house! But, there is no point going overboard with detail as little can be seen from outside the coach, especially as windows at the kitchen end are 'frosted'.


Tuesday 25 May 2010

Bulleid Restaurant/Buffet Build - Part 3 (Read the Instructions!)

I broke one of my golden rules - read all the instructions before proceeding. Having assembled all the parts I turned to the guidance notes on livery paint details and read that the grab handles are fitted after painting! Completely logical with hindsight as they are naturally coloured brass. I'll need to either scratch off the paint or overpaint with a brass colour. In preparation for painting, flux, finger prints and filings were removed with 'cif' kitchen cleaner applied with a tooth brush. The instructions said 'and then wash in a weak vinegar solution', which of course I did not read until too late.

Bodywork, roof and underframe were sprayed with grey car primer and then the underframe sprayed black. Bogies, end panels and roof were painted by hand. Which leaves the sides. It is recommended to spray but past experience on other kits resulted in more of a hammer finish than smooth grain so, I'm favouring hand painting. I have no idea the best way to achieve this so I practiced on the roof. The enamel paint was slightly diluted with white spirit, the brush fully loaded and paint applied in the same direction across the length of the roof. This left a reasonable smooth finish but with some streaking. With the paint just touch dry the paint was burnished with a dry finger and cotton cloth. This blended the streaks into the paint leaving a consistent and pleasing finish.

Before painting the sides I have decided to assemble the interior so that handling during this stage can proceed without potential damage to the sides top coat paint. The photo shows the body sides in grey primer.


Bullied restaurant/Buffet Build - Part 4

Bulleid Restaurant/Buffet Build - Part 1

Saturday 22 May 2010

Bulleid Restaurant/Buffet Build - Part 2 (Why do I do this?)

And here's the kitchen/buffet coach! 


Buffet area is behind the four windows at the far end. The restaurant coach couples to this end. Neither coach, by design, have buffers on the mating ends. Lessons learned from the restaurant coach assembly made this one a little more straight forward, albeit taking just as long to build with its own set of problems along the way. 

Most notable was fitting of the large gas cylinder to the underframe - it was missing from the kit. I have a feeling this was intended. I fabricated one quite easily from a piece of hollow plastic tube with the ends moulded from car body filler. I need to source some hook and bar couplings, preferably Backmann as the passenger coaches used in the train are by that supplier. Whilst I have been following auction lots on Ebay to tell you the truth they are about the same price as those from my local model shop so, I'll probably get them there and at the same time peruse all the other stuff in the shop - Nothing beats seeing things in reality! 

I have been evaluating my attitude to kit building. Do I gain pleasure from the craft itself, or is it just a means to an end? I have no doubt that had these coaches been available off the shelf then I would have purchased since I'm impatient to see and run my complete ACE. Never the less I am proud of my achievements thus far with the kit builds and the work has given me greater insight into the design and detail of Bulleid's coaches that I would not otherwise have gained. This all helps to complete a mental picture of what railway travel was like as we watch our trains chase their tails around an oval of track. Next stage is painting. I'll do that before building the interior details.


Wednesday 19 May 2010

Bulleid Restaurant/Buffet Build - Part 1 (Here we go!)

This is the Comet Models kit I'm assembling. It is an expensive but well designed and engineered kit. Assembly is not for the feint hearted. You need excellent eyesight (or in my case a magnifying glass) and manual dexterity in addition to appropriate tools. 

For the period modeller it is imperative that photographs and articles are available to check against. In particular, I found the very detailed scale drawings of the prototype in MRC Nov 1980 very helpful to correct at least one inaccuracy in the manufacturers instructions, i.e. battery box position. Or, did MRC get it wrong? 

None of the prototypes survived into preservation so there is not one to see in reality. The supplied instructions are quite good except the solebar assembly drawing is confusing causing me to fit them the wrong way around! Fortunately it is a soldered section so just sweating the joints enabled disassembly without damage. With the solebars fitted correctly the bogies then interfered with them, which was easily remedied by standing them off with extra small plates soldered to the chassis where they pivot. 

It is a heavy beast, being all metal construction, as heavy as a locomotive. It would be lighter for the pulling locomotive if the whitemetal components were manufactured as plastic mouldings. The roof, body, chassis and bogies will be disassembled for painting individually. But first, I'll build the kitchen/buffet coach for this two coach set used on the 'Atlantic Coast Express'. Oh, by the way, about 3 days solid work to get this far in the assembly.


Saturday 15 May 2010

Expo EM 2010 - Bracknell

I arrived early to bag a car parking space but need not have worried. This was a relatively small, specialist exhibition organised by the EM gauge society to display and promote EM gauge railway modelling, i.e. 4mm scale, 18.2mm track gauge. The number of visitors on the first morning could best be described as 'comfortable' allowing everyone space to get close to the exhibits. The quality of layouts were on par with those you would see at any club exhibition that are open to all modelling scales. 

What sets this one apart from others is the plethora of small traders selling all manner of locomotive and rolling stock components and scenic items for the scale modelling enthusiast. It was quiet overwhelming, boxes and boxes stuffed with small pastic bags containing obscure components you never thought you needed. I felt that if I did not buy something then I may never find such things again - so I picked up some tail lamps to place on the last coach/wagon of my trains.

My main reason for visiting was to purchase from one of these traders the Comet Models Bulleid rebuilt restaurant and buffet coach kits for my 'Atlantic Coast Express' that I am putting together. The picture here is of the contents from the restaurant coach kit. Assembly is going to be quite a challenge for me. You'll be able to follow my progress through this Blog.


Saturday 1 May 2010

Backscenes at Hewish Gates

I'm a late-comer to the current practice of many who now create backscenes from photographs. In the old days I had a go at painting backscenes or using Peco art backscenes - was not too impressed, so I reverted to just sky blue paint. Nothing could have prepared me for the amazing effect of using photographs of the real location. They add atmosphere and depth to the model on a scale I did not expect.

I created a panorama of stitched photos in Photoshop. Not all the scene is from one contiguous location. The landscape is varied enough that different areas can be stitched together to blend with the foreground model landscape.

The sky was cut out of the panorama and replaced with a sky blue layer, only because I felt the cloud formations would be a distraction from the model. Brightness and Saturation levels were adjusted negatively to produce toned down colours representative of the distant landscape. The scene was then cut into A4 chunks and printed. Each A4 is stuck to the next with double sided tape and this is stuck to the backboard.


Related Posts Plugin for WordPress, Blogger...